
I don’t know that I’ve ever met a Fly Fisher that has not heard of the Woolly Bugger. It is, per so many books, videos, and guide recommendations, one of those flies that must be in your arsenal. No, not could be. MUST to be. I have tied them, before. In fact, it is one of the most basic of flies to tie, so it was the introductory fly tying lesson, for me. Simple…and deadly.
Unless you’re me.
I have tied dozens, given away many of them, and had buddies tell me what they caught on them (yes, on the ones I tied, even). Some of those caught were quite impressive, too.
However…I have never caught a fish on a Woolly Bugger. Ever. Like, to the point that I have given up trying. They reside in my secondary fly box, large left pocket of my vest, opposite side from the terrestrial assortment (some of which do catch fish for me), but I think they have gotten used to just hanging out in the dark, and occasionally getting jostled about for no apparent reason.
Today, I thought to myself that it was time to revive the attempt. Perhaps I have matured in my line control, increased my casting accuracy, developed a better eye for reading the water…or maybe just grew a bit more patience. To kick this off, I tied a small set with a slight twist.
Needs:
- Streamer Hook – For this one, #8, 4xL, 2xH
- Black thread – 140 Denier
- Weighting wire – .020 Lead-free
- Bead – Brass, 3.8mm
- Body – Medium, mottled (olive/brown) chenille
- Body – Olive Saddle Hackle
- Tail – Olive marabou
- “Special” – Red marabou
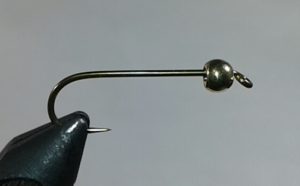
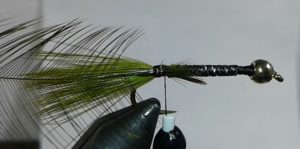
Start with the basic hook, barb flattened and bead threaded over it, to the eye. As usual, smaller opening on the bead faces the eye.
Once locked into the vise, I put 20 turns of the lead-free wire on the shank of the hook, to supplement the bead and the extra-heavy hook. I want this to sink, even in fairly quick waters, so I have the choice of depth, rather than just taking what I get, near the surface. Once that is in place, I tie on the thread, between bead and wire.
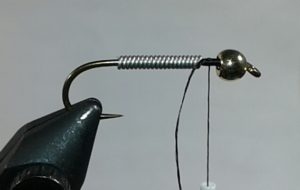
Now, wrap (almost) everything! Ok…more specifically, wrap the weighted wire well, to lock it into place, build a bit of a thickness between that and the bead, so the body is even, and a think area right behind the bead, to lock it in place. I do not wrap to the actual diameter of the back opening of the bead, as later I want the whip finish to be able to sink down into that small channel. Finish up with the thread behind the wire, and with a ramp of thread evening out the space behind where the wire ends.
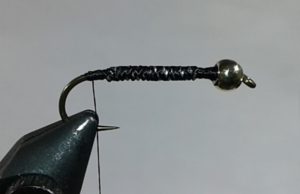
Tie in the olive marabou, with the tips facing backward, and roughly a hook-length protruding behind the tie-in point.
Trim the forward facing portion, after 2-3 tight wraps to lock the rest in place. Next, tie in the olive saddle hackle, by it’s tip end, with the bulk of the feather extended beyond the hook bend. You will want to run your fingers down the feather, so the fibers are sticking out to the sides. two or three more tight wraps, and trim off the protruding bit of the tip.
After this, cut off a 3-4″ length of the chenille, then pinch the last 1/8″ of one end between the nails of your thumb and first finger. Now pull. The more colorful and fluffy fibers of the chenille should pull loose, leaving the thread core exposed. Tie that thread core on, in the same place as the marabou and saddle hackle, also extended to the rear of the fly. Once in place, tight wraps to ensure the pieces you just added are truly locked down, then wrap forward to behind the bead.
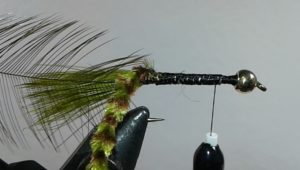
Half-hitch the thread in place, take the end of the chenille in hand, and start rotating the fly so the chenille wraps it’s way up the hook shank and very close turns. Some people recommend twisting the chenille, to tighten it up, so if the body looks too loose, feel free to back off and do that. Once you wrap this up to behind the bead, tie it off with two tight wraps, ensuring that the thread grabs the chenille and wraps down into the gap behind the bead. Already looks like a fat, little forage fish.
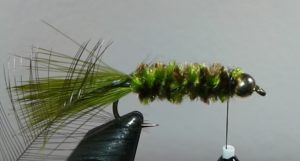
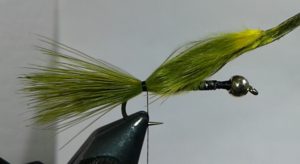
Now, for my twist. I took a few wispy fibers of the red marabou and tied them in on the sides of the fly, 2-3 strands per side, just behind the bead. The picture has them looking kinds crazy, but that’s just because I could not groomed them into place, until the next step is also completed.

That done, re-anchor the thread in place, unlock the vise head, grab the end of the saddle hackle, and rotate to wind it up the body (it should snugly fit into the wraps of the chenille), until you reach just behind the bead. With the red marabou in place, you will need to be cautious and move them out of the way, so they don’t get pinned under the saddle hackle wraps…or the thread wraps when you lock down then trim the hackle.
Once you complete these steps, you brush back the red marabou, whip finish, add a drop of head cement on the final wraps, and there you have it.
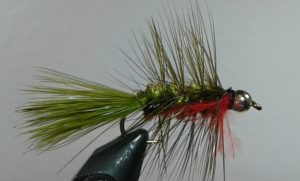
My thinking is this: Many guides and texts highlight the idea that the Woolly Bugger is a representation of a forage fish that is often retrieved in short, staccato strokes, making it appear to “dart” from place to place. There are also many references to pauses, to make the “fish” seem dazed or injured. When one pauses, the marabou in the tail fans out in the water, making a life-like movement. To me, the addition of the red marabou, right behind the “head”, might suggest a small puff of blood, that could just catch the eye of a nearby trout, suggesting an injury at the head/gills of the potential meal.
Will that work? No idea. If it does, it will mean that I will have caught a fish on a Woolly Bugger, so I will simply not care if this is truly why…
Tight lines.